Camera Setting Guide | Cheat Sheet
Download the cheat sheet on your phone >
Here's the Full Spivo Shooting Guide
Beware, the following is not for the faint of heart. It is thorough and long. It contains all our notes and camera details from the last several years. The most important elements from the guide were summarized in the cheat sheet above!
Aspect ratios - Wide, Tall, Square, and Portrait >
Frame rates - 24fps, 60fps, and 120fps >
Resolution - 1080p, 2.7K, and 4K >
Field of view - 0.5x, 1.0x and 2.0x Zoom >
Audio - Talking, and Natural Sounds >
Lighting - Outdoor and indoor >
Camera angles and different shots >
Themes - same shot in multiple locations >
Transitions - matching scenes >
Section 3 - Organization and file management
Section 1 - Camera Settings
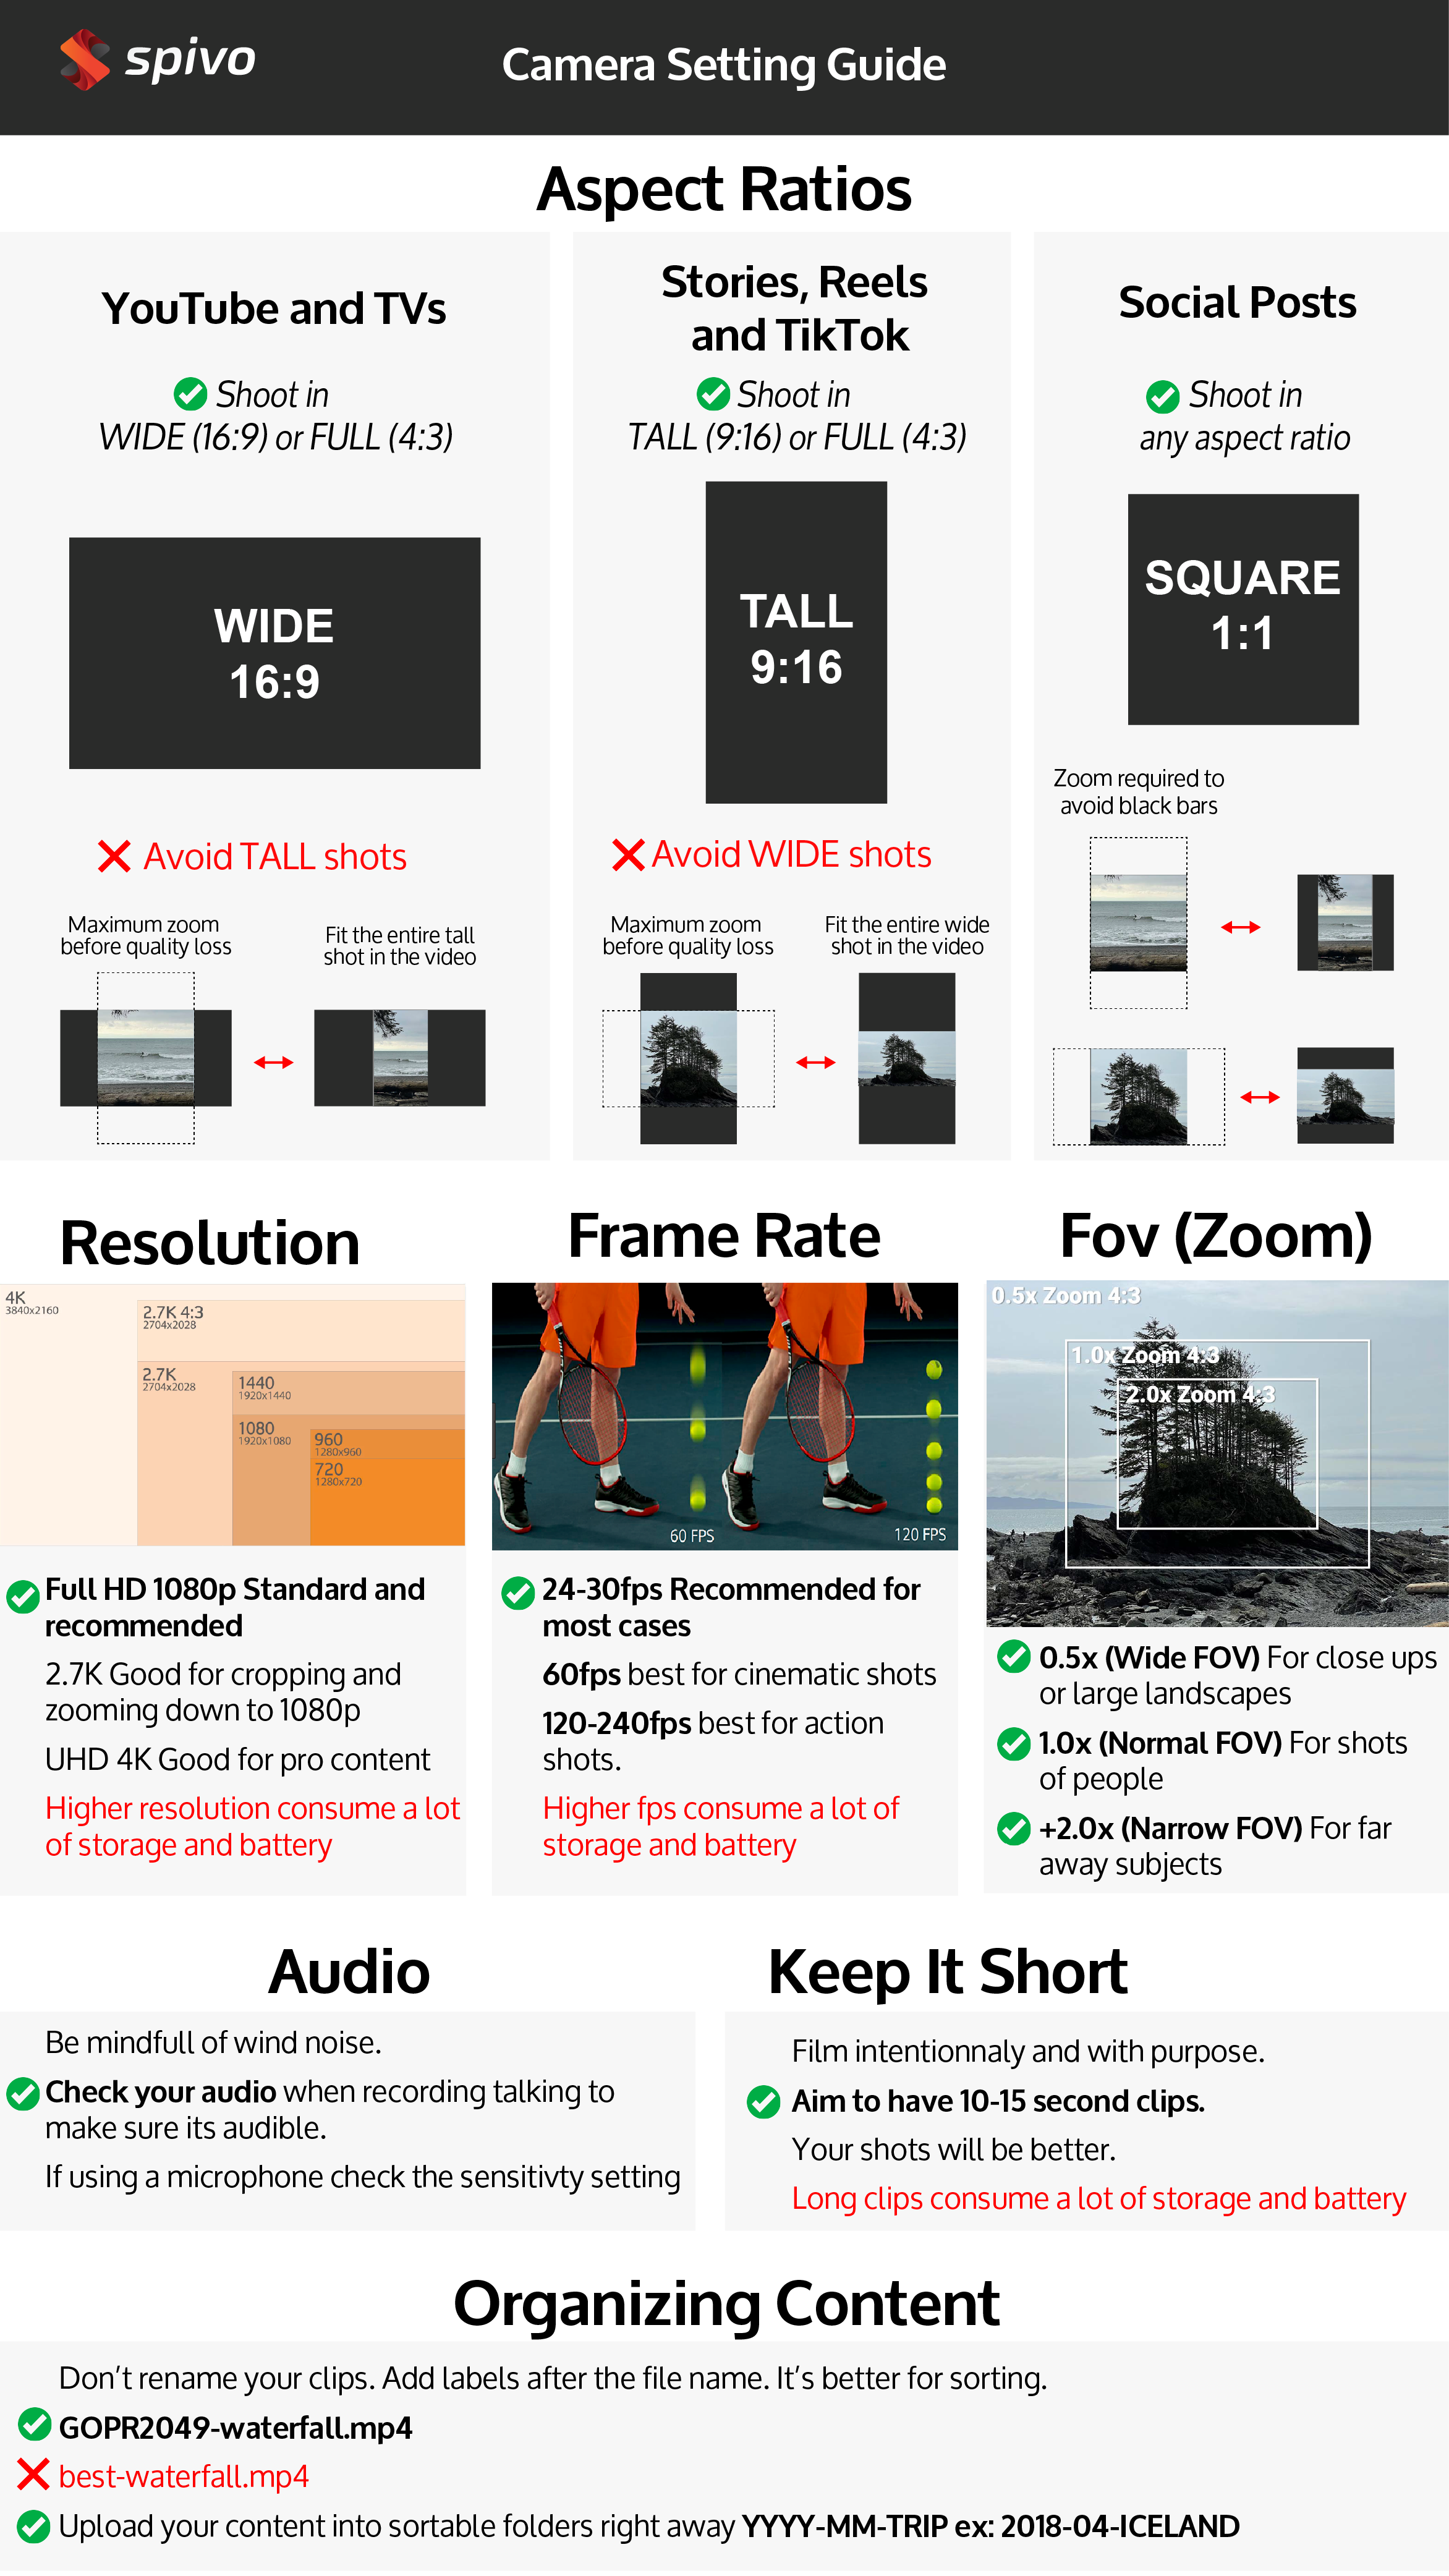
Aspect ratios - Wide, Tall, Square, and Portrait
Recommended setting: Shoot in wide (16:9) across all your cameras and phones.
It’s important to understand the different aspect ratios to make sure your videos look their best wherever you post them.
The aspect ratio of a photo or video is the proportional relationship between its width and it’s height, in other words, how wide compared to how tall an image/video is shown.
Aspects ratios are typically expressed as two numbers, which are separated by colon or “x", such as 16:9 or 16x9 (pronounced "sixteen by nine", or "sixteen nine"). A sixteen by nine aspect ratio means that if an image is 16 parts wide, it will also be 9 equal parts high.
The most common aspect ratio to is 16:9, although several other aspects ratios are gaining in popularity on specific platforms. Aspect ratios are generally set in the camera when filming, although you can change the aspect ratio while editing by zooming in or out.
Wide - 16:9 - Filming sideways on your phone
This is the most common aspect ratio across all platforms (phones, tv’s, computers, Netflix, YouTube etc…)
Use for: YouTube videos, or viewing on your TV at home.
Tall - 9:16 - Filming vertically on your phone
This tall video format is used viewing or filming on a phone. To add 9:16 footage to a 1:1 or 16:9 video, you’ll need to add bars to the side of the footage or zoom in substantially.
Use for: Instagram reels, stories or Tiktok
Full - 4:3 - Filming on your GoPro or taking a photo
This aspect ratio is one of the shooting modes in GoPro cameras, and is mostly used to crop back to a wide, tall, or square video. It is also the standard aspect ratio of most photos.
Square - 1:1
Square videos are great for social posts on Facebook or Instgram. Most square videos start out as wide videos (16:9) or tall videos (9:16) and are cropped to 1:1 in post editing.
Use for: Instagram and Facebook posts
Portrait - 4:5
A 4:5 aspect ratio generally looks better on a social media on a phone as it takes up more screen space on your news feed (it’s a slightly taller than a square (1:1) video.
Use for: Instagram, Facebook posts, Stories, Reels, Tiktok
General note:
Keep in mind, you can always change the aspect ratio for a specific medium (e.g. YouTube) in post-production. However, it’s will involve zooming in and/or add bars to side of the footage which generally doesn’t look as good as footage that’s shot natively in the correct aspect ratio.
With that in mind, what are you planning on doing with your videos? If you’re simply planning on posting them on YouTube, select a 16:9 aspect ratio to maximize the screen space. On most cameras, there are few different shooting modes.
Frame rates - 24fps, 60fps, and 120fps
Recommended setting: Shoot in your camera’s standard framerate: 30fps / 29.97fps or 24fps / 23.97fps.
Frame rate is the number of pictures (or frames) per second in a given video. So we’re all on the same page, all videos (filmed on GoPro’s, iPhones, or any camera for that matter) are made from a number of images played in sequence. Frame rates are commonly written out as a number followed by FPS, which stands for “Frames Per Second”.
The most common frame rate for is 30 FPS, followed by 60 FPS, 120 FPS, and 240 FPS. It’s important to note that anything below 18-20 FPS, will appear blurry to the human eye. Depending on the environment and action in your video, in some cases, video shot at 30 FPS can appear blurry if an object is moving very fast.
For most adventure and travel videos, like sightseeing or snorkeling trip, we generally recommend shooting in 30 FPS, which will conserve your battery and keep your video file sizes down.
So when would you want to shoot at a higher frame rate?
You’ll want to use frame rates 60 FPS and above when shooting in fast environments or high action sports (car racing, to capture a soccer ball after being kicked, when flying by the camera while skiing/snowboarding, etc…) Another use case is if you plan on making slow-mo videos or using slow-mo’s to make shots look more cinematic.
For example, if your shooting at 80 FPS, you’ll be able to slow down when video editing your footage by 37.5% (30/80 = 0.375 or 37.5%) to bring it down to 30 FPS, while still capturing great video quality.
Verdict: For most adventures, shooting in 30 FPS is sufficient, but if you want to have cinematic slow-mo’s or are shooting fast activities, shoot in 60FPS or above.
Resolution - 1080p, 2.7K, and 4K
Recommended setting: 1080p (HD WIDE)
Resolution is the overall image size of the video you're shooting. The resolution number refers to the number of horizontal lines (or vertical pixels) on the display. Pixels are the smallest addressable element of an image, e.g. the amount of dots that make up the overall image or video.
For example, a video that is shot in 1080p, this means the image is 1920 pixels wide and 1080 pixels tall.
Nowadays, the most common shooting modes today are 1080p and 4K. Although it might be tempting to shoot at the largest setting to capture the most pixels (i.e. the clearest and largest video), that’s not always the best case. Before embarking on your adventure, ask yourself what you're going to be doing with the footage. Will you be editing the video yourself or will you be using a Video Editing Service? Let’s break down the various options below and provide some suggestions when you should use them.
720p (SD WIDE)
1280 x 720
Not worth shooting at this resolution (low quality, most smartphones have better image quality than this)
960p (SD FULL)
1280 x 960
Still not worth it unless you really really want to conserve your battery and keep the video file sizes down
1080p (HD WIDE)
1920 x 1080
1080p is the industry standard and is often called HD (High Definition). Most computers, TVs, and phones can easily play 1080p footage. If your simply looking to make a YouTube video of your trip, shoot it in 1080p.
1440p (HD FULL)
1920 x 1440
Same picture quality as 1080p expect the video is taller and less of the view is cropped. Used in GoPro cameras. Useful for filming action scenes where you can crop to a wide video more precisely.
2.7K (HD+ WIDE)
2704 x 1520 - Advanced
2.7k offers great image quality however, you’ll have to deal with larger file sizes and might have difficulty playing/editing videos depending on your device or computer, which can make 2.7k footage a bit of a nuisance.
You can also use this footage to zoom into your video and crop and still output a great looking 1080p video.
4K (UHD WIDE)
3840 x 2160 - Advanced
The largest and best resolution commonly offered on most cameras. Although you’ll get very high-quality videos, manipulating, editing and playing 4k videos can be time confusing and challenging due to the large file sizes. It’s important to keep in mind that you’ll also drain your battery much faster shooting at higher resolutions, especially when it’s cold out.
You can also use this footage to zoom into your video and crop and still output a great looking 1080p video.
Recommend for video that will be watched on a large screen (large monitor or TV)
General Note
If you're just starting out, we don’t recommend shooting in 2.7k or 4k for these reasons. When in doubt, film in 1080p to keep your video file sizes relatively small, and still have great quality video, all the while not chewing up too much battery. If you want your video to look it’s absolute best, then opt for 4k.
Field of view - 0.5x, 1.0x and 2.0x Zoom
Field of view is essentially the observable scene your camera will capture, or in other words, the zoom. There are a few different modes to choose from in your camera’s settings:
Wide Angle FOV or 0.5x Zoom
The wide angle perspective created mostly on GoPro’s or iPhones (0.5x mode) camera means you’ll capture more of the background and your surroundings, and you won’t crop out your head or feet, buildings, snowboard, skis, surfboard, etc… The wide angle perspective is great because it captures moments in a way that is similar to what you physically see with your eye. What does this mean for you? It means you get realistic looking video. The downside to shooting in wide is that your videos will appear warped in the corners, but you may find that that is not all that noticeable, particularly if you're mostly focusing on subjects in the center of your image (e.g. selfies). Also, you may notice that far away objects (like mountains or landscapes) will appear smaller or farther away.
When to use wide angles:
- Big landscapes
- Close up shots
- Selfies
Regular FOV or 1.0x Zoom
Most phones and drones film by default in a regular FOV that isn’t super wide (or distorted). On GoPro camera’s, there’s a mode called “Narrow FOV” where the camera is actually shooting at 2.7k resolution, and is being cropped down to 1080P. This means the camera is actually only capturing what’s in the middle of the sensor, so you’ll have less fisheye effect or distortion in the corners caused when shooting in wide.
When to use regular FOV:
- Most normal fiming scenarios
- Landscape
- Pictures of subjects that are far away
Narrow FOV or 2.0x Zoom
Zooming in is great way to make landscapes look large and dramatic. Shooting zoomed in will pull objects forward and make things in the background be compressed closer to the foreground, commonly called the “Compression effect”. This can be accomplished using a telephoto lens, zooming in on your iPhone, or using a narrow FOV on a GoPro.
When to zoom:
- Specific subject
- Drone photography
- Interviews or portrait photography
- Far landscapes
Now that you have a better understanding of the various field of view options, think about where you're going to be shooting, and what look you are trying to achieve for those specific shots.
Audio - Talking, and Natural Sounds
Natural Sounds
Audio is a important consideration especially if you want your video to have a cinematic look. The most commonly overlooked issue with most videos shot outdoors is wind noise. Unfortunately, it can be quite difficult to remove wind noise from videos. For this you would need to use a “Shotgun Mic” accessory.
Recording Talking
If you plan on capturing important talking scenes (e.g. a proposal on a mountain), you should always test the audio and listen to it to ensure it sounds okay If there’s noticeable wind noise, you can try to block or shade the camera from the wind, although it’s probably best to find a different spot that’s less windy.
Pro tip
For crucial audio, record a voice memo on your phone and pace it as close as posibble to the scene. It can be inserted in post production.
Other camera settings
GoPro Protune, etc. https://www.spivo.com/blogs/news-updates/gopro-protune-settings-everything-you-need-to-know-before-you-shoot-with-it
Section 2 - Creative content
Plan your shots
Planning your shots is the first step to improving your videos. By planning your shots a little bit in advance (even if just in your head), the chance of telling a better story will be higher. So instead of rushing to press that rec button, first take some time to observe the area around with your own eyes. You may discover new camera angle opportunities or lighting combinations which could be used for your advantage. Taking this route makes the likelihood of creating a good video wishful thinking. If you commit to being a little more creative and to trying a little bit harder, your videos will be much better.
How do you plan your shots?
- Story is key! Make sure it follows a storyline with an intro, body, and outro
- Think ahead about camera angles and camera movements
- Think about light and choose the best time of the day to film (ideally sunrise and sunset)
- If you are creating a complex video, consider creating a storyboard
- If you have a specific shot in mind, don't be afraid to preview the shot on your phone or watch the recording to make sure you're totally satisfied before moving on to another location
Keep it short
How many times have you seen amateur films shot from the same angle for five long minutes? It’s painful. I’m not that guy; you shouldn’t be either.
Take a second to think about how long a shot lasts in an actual professional video. It’s seconds.
I challenge you to find a TV show or movie that uses the same camera angle for more than 10 seconds. It’s rare.
So, why are you?
This simple tip will help you make your videos more dynamic by cutting out the unnecessary.
Shorter is better. Especially when it’s about fast actions.
Pro tip: Next time you’re shooting a video, record for no more than 10 seconds, then move. If you have a shot list like we’ve talked about, you’ll have a ton of great angles to choose from. With longer scenes, film the same shot from two or three different angles. It’s way more watchable!
Lighting - Outdoor and indoor
The most overlooked and simple way to make your videos look their best. Take an extra second to reposition yourself to get the benefits of any natural lighting.
Outdoor lighting
The best time of day is sunset and sunrise, the light is softer and a nice color. Shooting a the sunrise or sunset is always nice, but take that opporutnity to fim interesting scenes or subjects with the scene behind or on the sides of your camera.
Indoor lighting
Middle of the day with a large window behind or on the side of the camera will have the best effect. If you are using lights, try to only use lights with the same temperature (warm, cool, etc.).
Camera angles and different shots
Change up the angles
It’s easy to get in the habit of always filming while standing from your normal point of view. Try getting lower and higher to get different perspectives. Put the camera down, on a tripod, or on a object and get in the shot. Give the camera to kids, or strangers to help you get a different shot. Have fun with it!
Don’t forget about timelapses
This is an awesome way to capture video of something that occurs really slowly. We find ourselves filming time-lapses more often to capture sunrises/sunsets, to film clouds moving fast, or even to walk around a new spot while filming with the Spivo 360 swivel selfie stick. The advantage of time-lapses is that it speeds up the video to a pace which is more watchable for the average viewer. Sadly, a 10-minute long video of the sun setting is pretty boring to most people however, a 5-10 second timelapse of it equally shows just how awesome it was.
Themes - same shot in multiple locations
A cool video strategy is to repeat a specific kind of shot in many new and interesting locations. Film yourself walking through doorways, jumping with your arms up or holding hands in every location. Let your creativity take over!
Transitions - matching scenes
A good video transition matches similar clips together so that the video flows better. Here are some examples:
Match camera motion
End a shot with fast camera motion and start the next shot with fast camera motion in a similar direction.
Match scene colors
End a shot on a specific color and start the next shot on a similar color. For example, ending a clip on the sky, followed by a shot starting on the ocean.
Match scene composition.
End a shot with a strong shape in a particular position in the frame, and start the next shot with a similar shape and position. For example, end on tall trees, and transition to tall buildings in the same screen position.
Section 3 - Organization and file management
Unload SD cards as soon as possible, don’t wait otherwise you forget what's on there.
Keep original file name
Sort into folders per trip then per device
Don’t trim, if you do leave at least 10 seconds before and after the section you want
delete unwanted duplicates
Upload to the cloud, our favorite is dropbox
Organizing Projects
Before you start making a video, start by storing your content on a hard drive, or your computer. We suggest creating folders with this format: “YYYY-MM-Location” (Y being the year, and M being the month) so that you can sort your trips in chronological order. For example "2019-02-Hawaii".
Labelling Clips
Should you rename your clips?
After many years, we’ve tried just about everything under the sun for organizing content. It might seem like a good idea to rename files, but this will only add time when making a video. Instead, we only rename the best clips while keeping the original file name:
ex: “ GOPR2049-best-waterfall.mp4” not best-waterfall.mp4
Keeping the file name at the beginning is a good way to keep the chronological order of your clips. Adding a descriptor to the end of the file name makes it easier to find them while still allowing you to search by file name or picking the previous or following cip.