Remote for GoPro User Guide
A basic user guide and instructions to operate and use the Remote for GoPro cameras by Spivo.
Buttons descriptions
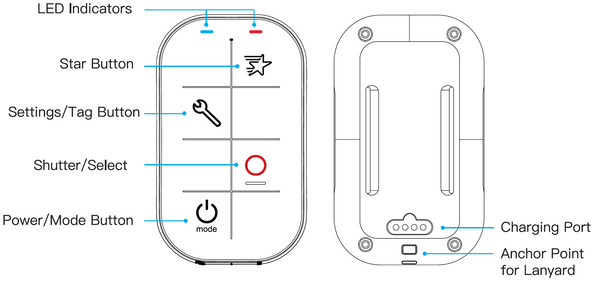
Power/Mode Button
To power on: Press and hold the Power/Mode button for two seconds.
To power off: Press and hold the Power/Mode button for four seconds.
Press the Power/Mode button repeatedly to cycle through the modes such as Video, Photo, and Burst.
Settings/Tag Button
Press the Settings/Tag button to enter/exit the GoPro settings mode. While recording the video, press the settings/tag button for 2-3 seconds on the remote to add a HiLight Tag (only available on certain GoPro cameras).
Shutter/Select Button
Use the remote to capture video and photos with one camera or multiple cameras. Press the Shutter/Select Button to Start/Stop recording or taking photos.
Star Button
Set your preferred shooting mode by programming the Star button. Once programmed, press the Star button to enter your specified shooting mode. Programming steps are provided below.
LED Indicator Description
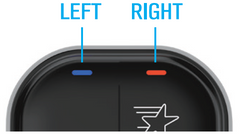
Left light
Blue light blinking: the remote is not connected with the camera
Blue light on: the remote is connected with the camera
Red light on: Charging
Red light off: Remote is completely charged
Right light
Blue light on: Video mode
Red light on: Photo mode
Green light on: Burst mode
Red and Green light on at the same time: Time Lapse mode
Blue and Green lights on at the same time: Night Lapse mode
Red and blue lights flashing alternately: The power of the remote is low. The remote needs to charge.
Blue, Red, and Green lights on at the same time: Settings mode
How to Pair Your Remote and GoPro
1. Turn your GoPro on
2. Turn on the Remote for GoPro by pressing the Mode button
3. Next, you’ll need to turn on the WiFi on your GoPro. On most models with LCD screens, you can do this by swiping from down from the top to the bottom of the LCD screen. You’ll then see either “Connect” and/or “Preferences”.
4. If you only see “Preferences”, press it. Then press “Connections”, then “Connect Device”, then “Smart Remote”. The GoPro will then go into pairing mode.
5. If you see both “Connect and Preferences”, Hit “Connect”, then select “Connect a new Device”, then select “Smart Remote”. The GoPro will then go into pairing mode.
6. On older GoPro models, such as the Hero 3 and Hero 4, a WiFi button is present on the side of the camera. When you press it, a blue light will appear. You’ll need to scroll through the settings menu to connect a new device.
7. Once paired, the GoPro will turn on and off when you press the Mode button on the remote. Generally, the pairing lasts around 24 hours.
Settings Mode
Press and hold the Star button for four seconds (once the camera and remote are on and connected). The Blue light, Red Light and Green light on the right will turn on. The remote is now entered into settings mode.
Next search on your phone or computer for the Wi-Fi named “HERO-RC-XXXXXX”. Connect to it.
Enter http://10.71.79.1 or http://gore.local into an internet browser to get into the Remote options. You might need to refresh the page once it has loaded.
Press and hold the Star button for four seconds to exit the settings mode.
How to Set Up the Star Button
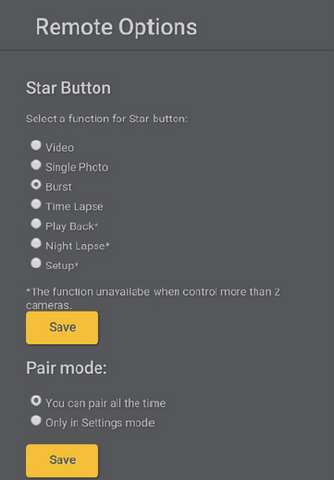
Enter “Setting Mode” previously described above.
Choose your preferred mode “Select a function for Star Button”, click the “Save Button”. Next, disconnect your computer from the WiFi remote and re-connect your remote to your GoPro. Once connected, the Star button should engage the mode you previously selected. To action the shutter on your starred mode simply hit the button with red circle (shutter button).
Battery
When the power of the remote is lower than 10%, red and blue lights on the right will flash alternatively every five minutes.
You can check the battery level by entering the “Settings Mode”
For the full instruction manual, please refer to these instructions.