
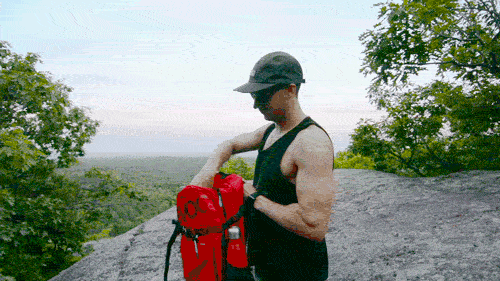
Woot woot! You’ve now got your Spivo 360 and you’re ready to capture amazing adventurous memories on your upcoming adventures! We’re pretty jealous because we’d love to come along, but we’re sure you've deserved it.
First, let’s start by going over what you've received to make sure your familiar with your purchase.
Your Spivo 360 comes with the following items:

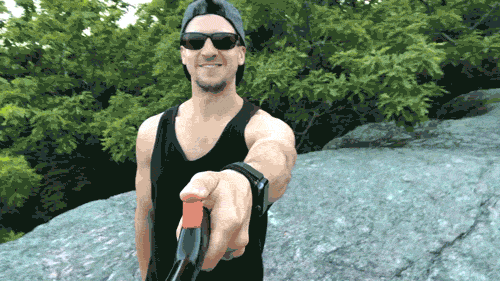
To ensure everything is working properly, click the orange button in the handle with your thumb. When pressed, the black GoPro mount and screw should rotate 180 degrees, if it's crooked or loose, follow these instructions.

If you ordered add-on items such as the Tilt Phone Mount and Bluetooth Remote, Buoy Floatation Device or the Remote for GoPro cameras, kindly verify that these items were included with your order.
Everything there? Sweet!
How to unmount and mount your camera:
It’s important to know how to correctly mount and unmount your camera. Should your camera ever become loose, or appears to be crooked, you’ll be able to easily adjust it such that the camera points perfectly forwards/backward using these procedures.
To loosen and remove the GoPro mount

- Hold the orange disk from the bottom of the Spivo 360.
- With your free hand, grab the black GoPro mount and turn it counterclockwise, while holding onto the orange disk tightly, until it is loose or completely removed.
To line up and tighten your device on the Spivo 360

- Hold the front housing portion from the bottom. Spin the orange disk clockwise such that it bottoms out against the black housing.
- Turn the orange disk counterclockwise a quarter turn to raise it off the bottom of the black housing. We don’t want it rubbing against the bottom. Once it's off the bottom, hold the orange disk firmly with two fingers.

- Turn the GoPro mount clockwise until it is very close to the orange disk. Ensure you've spun the GoPro mount at least two full rotations on the screw.
- Align the GoPro mount to the nearest position where the three prongs on the black GoPro mount are parallel to the length of the stick. Hold it in place.

- Turn the orange disk counterclockwise firmly to push it against the bottom of the black GoPro mount. This will lock the alignment of the GoPro mount in place.

- If your camera or phone is not already mounted, align the pongs of your camera or Tilt Phone Mount with the pongs on the GoPro mount, and insert the screw. Turn the screw clockwise until it is tight.
What if the GoPro mount, or camera, is still loose or crooked?
This can happen if you keep screwing the black GoPro mount clockwise without stopping to line it up. To realign the mount follow these instructions:
- Hold the black GoPro mount and turn the orange disk clockwise
- Align the GoPro mount so its parallels to the length of the Spivo 360
- Hold the GoPro mount in place, and firmly turn the orange disk counterclockwise
How to attach the GoPro Camera

- On the Spivo 360, remove the black GoPro screw (thumbscrew) by turning counterclockwise.
- Insert the GoPro into the black GoPro mount. The 2 prongs of the GoPro camera will fit in between the three prongs on the black GoPro mount.
- Align the holes on the side of the GoPro camera with the holes in the black GoPro mount. Once aligned, insert the screw and turn clockwise until snug.
How to attach the Tilt Phone Mount
First, start by ensuring the black GoPro mount is screwed on the Spivo 360 and ensure the GoPro mount's black prongs are parallel to Spivo 360.

- On the Spivo 360, remove the black GoPro screw (thumbscrew) by turning counterclockwise.
- Insert the Tilt Phone Mount into the black GoPro mount. The 2 prongs of the Tilt Phone Mount will fit in between the three prongs on the GoPro mount.
- Align the holes on the side of the Tilt Phone Mount with the holes in the black GoPro mount. Once aligned, insert the screw and turn clockwise until snug.

- Insert your phone in the Tilt Phone Mount by pushing one side of your phone into the top portion of the Tilt Phone Mount. The Tilt Phone Mount will spring open once pushed such that the bottom end of your phone fits in. Always test to ensure your phone is secure prior to using it.
With larger sized phones, the rotation the Spivo 360 might be slower than with a lighter camera such as a GoPro. To minimize the overshoot or oscillation on the phone after its rotation, simply press the button slowly and with less vigor. Adjusting the vertical angle on your phone/Tilt Phone Mount can also reduce the overshoot with some phones.
How to Take Photos and Videos with the Spivo 360
There are many different ways to activate your camera and take pictures and videos remotely. Let’s start by breaking it down into two categories: smartphone users, and GoPro users.

For Smartphones:
- Use the built-in timer in your camera application. For iPhone users, you can set a timer for three or ten seconds with the native camera app.
- Use our Bluetooth Remote to activate the shutter. It attaches onto the Spivo 360 and connects to your phone via Bluetooth signal. Once the remote is connected, you’ll be able to remotely action the shutter of your camera when using your camera application. It is also attachable onto the Spivo 360 using the supplied clip.
- Pause a video you've already taken and take a screenshot. The screenshot photo will inevitably be of lesser quality than if you had taken an actual photo, but it works! To obtain the best result, we recommend shooting in a higher frame rate than your default video settings. Shooting in 120 fps (frames per second) or 240 fps is recommended to ensure you have more video frames to choose from to find the perfect still image.

For GoPro’s:
- Use the time-lapse function. Available on any GoPro, this setting is used to take a photo every 0.5 seconds (s), 1s, 2s, 5s, 10s, 30s, etc… You can choose the time between photos either directly on the camera, or by using the GoPro app.
- Use our remote for GoPro’s. Our remote connects to your GoPro using the built-in WiFi signal of your GoPro. Once the WiFi signal on your GoPro is turned on, you’ll be able to connect the remote and action the shutter in whichever mode your GoPro is in (photo, video, time-lapse, etc…)
- Similarly to smartphones, you can always take screenshots of your videos to obtain still images. Again, for the clearest image possible, you’ll want to shoot your video with a high frame rate.
- Voice control: some GoPro’s have voice control which lets you speak commands such as “GoPro take a picture” or “GoPro start recording”. This feature is available on HERO5 Black, HERO5 Session, HERO6 Black, HERO7 and Fusion.
For more GoPro tips and tricks, as well as our recommended video settings to get the best travel videos, read our comprehensive guide for understanding GoPro settings.
How to Travel with it
So you’ve got your Spivo 360, and you’re probably going on an adventure real soon. There are a few different ways you can pack your Spivo 360.
First things first, yes, you can bring your Spivo 360 in your carry-on bag. We’ve done it many times, and so have thousands of other adventurers. Only once, did we hear that a TSA (Transportation Security Administration) agent gave someone a hard time with it. With that, if you ever have a hard time at the gate, show the agent the swiveling function on your Spivo 360, and tell them your part of an exclusive group of adventurers around the world, they should let you pass ;)
Your Spivo 360 is 20 inches long, so you can either put it in your daypack if you’re traveling with one or fit it in your carry-on bag. For most airlines in North America, the maximum size for a carry-on bag is 22 x 14 x 9 inches, so your Spivo 360 should easily fit. If you want to check with your specific airline, this site is a good reference point. Otherwise, it will surely fit in your checked bag or luggage.
Maintenance
For the most part, you should be able to use your Spivo 360 maintenance free. The only caveat is when using your Spivo 360 in dirty, salty, or sandy water. It is best to limit it’s exposure to these environments, like dirt, or sand can get in the rotating mechanism and start clogging things up.
If you’ve noticed that your camera is rotating slower or doesn’t seem to spin freely when the orange button is pushed, this is a good indication that you need to clean it out with fresh water. Refer to the video instructions above to rinse out your Spivo 360. For the best results, use hot water and rinse until you’ve flushed everything out (this can take 5-10 minutes if for example, it’s completely full of sand).
If you’re planning on using your Spivo 360 to go snorkeling or swimming in salt water, rinse it with fresh water after you’re done using it. When using it in these conditions, it’s a good idea to attach the Spivo Buoy which is our floatation device that floats both your Spivo 360 and your camera. For divers, get in the habit of rinsing it with fresh water when you rinse off your dive gear after a dive.
Three tips to try on your first adventure
To help get you started we took three tips from 13 Tips to Get Better Videos with Your Spivo 360:
Tip 7: Follow cam shots

A follow cam shot is when you're following someone and filming them. With the Spivo 360, it’s easy to switch between yourself and the person in front of you. Walk behind your adventure buddy and scream their name or say something silly and capture their reaction. Follow cams are a fun way of capture yourself and the spontaneity of that given moment or adventure.
Tip 8: Change the angle
Want to change the angle of your GoPro or phone to get the Spivo 360 out of the shot? This can be done by angling the camera by approximately 20 degrees from the vertical resting position. You’ll notice when you click the button on the Spivo 360, the camera will be pointing towards the sky, so bring your arm down and tilt the Spivo slightly downwards to capture a nice shot of the horizon. Do this transition faster for a sweet motion transition.
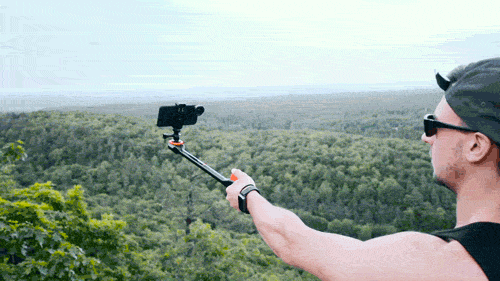
Here's the result of that selfie:
Tip 9: Use the built in whip pan transition to make awesome travel videos
When you click the button to swivel the camera, it creates a video transition effect called a "whip pan". By definition, a whip pan is a fast video transition between two clips which creates a rotational blur effect similar to a whip in action (hence the term “whip pan”). The Spivo 360 always rotates clockwise, so you can place multiple video clips together, and edit the transitions during the camera rotation (during the whip pan) to create really fun and interesting videos that make it look like you're in a new spot at every transition. Ana and her boyfriend did this all along their 3 month trip to 10 countries, and it made a super fun travel video of their trip.
Bonus Tip: Try the No-Look-Back Selfie
This shot is particularly cool to take when you've reached the summit or highest point of a hike, spot or building. It gives the appearance that you're higher than you really are so you get that epic looking shot. To get a no-look-back-selfie, simply stare at the horizon and raise your Spivo 360 high up and behind you. For the best result, take multiple pictures with your arm in slightly different positions and heights. This way you'll have multiple shots with different backgrounds to choose from. These types of third-person perspective shots look very realistic and make it feel like you are there.

View all 13 tips to get better videos
If you liked these tips, you’d also like this article about 12 things you didn’t know you could do with your Spivo 360 where we share a bunch of creative ways to use it.
Hopefully, you found this blog useful. You should be ready to rock and roll wherever your next adventure takes you!
Happy adventure!
PS are we adventure friends? Follow us on Instagram and tag @spivo and use #spivo for your chance to featured!

4 comments
Oct 18, 2018 • Posted by Larry
Does the remote control work with the GoPro hero 7 ?
May 07, 2019 • Posted by Spivo
Hey Larry, the Remote for GoPro works with the GoPro Hero 7 Black. For full compatibility please see https://www.spivo.com/collections/frontpage/products/gopro-remote
Sep 13, 2019 • Posted by Ashley Barton
Hi, when I first came to your site, I saw there was a pop-up message to enter in my email to receive 10% off my first spivo product by signing up to the blog. I entered in my email and clicked the submit, but it said “something’s not working, try again later.” But on returning to your site to try again, the link did not appear. Is this offer still available? I am thinking of purchasing the spivo 360 product, but would like the 10% off.
Sep 13, 2019 • Posted by Spivo
Hey Ashley, you can sign up to the adventurist here: https://www.spivo.com/pages/adventurist-sign-up
Hope that helps!
Andre from Spivo
Leave a comment